Support
Before or After the Event
- General Information: youremail@yourdomain.com
- Technical Support: Fill out the form below
"*" indicates required fields
During the Event
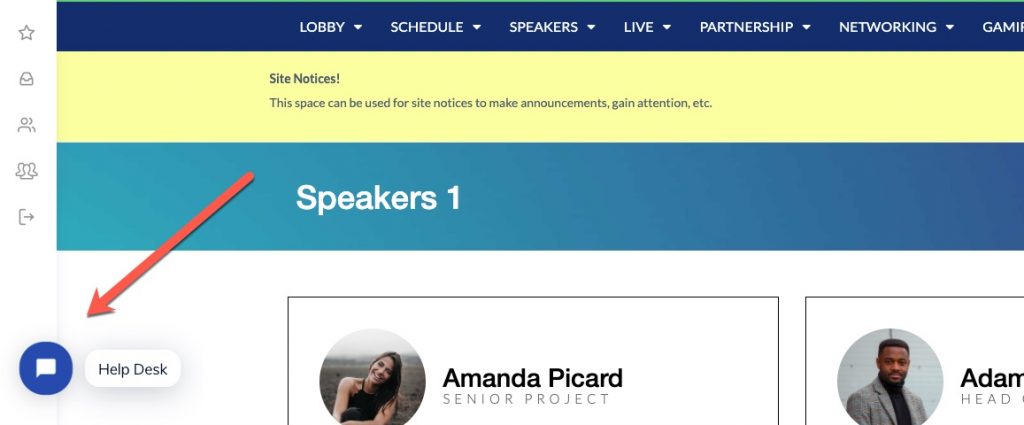
Beginning 1-2 hours prior and throughout the event, there will be a Live Tech Support Chat Widget in the bottom left hand corner with representatives on hand to assist. Simply click on the bubble to start a chat.
Registration & Logging In
Upon successful registration, you will be automatically logged in and will remain logged in for up to 14 days unless you log out, clear your cookies, use a different browser, etc.
If you received an invitation to attend and registered your participation, you may use your provided login credentials on the Sign In page.
Cookies Error
If you are seeing a “cookies” error after attempting to login, you may already be logged in. (You will see your name in the upper right corner instead of the Sign In / Sign Up buttons)
Try clearing your cookies for the [event] website by following the directions for your specific browser here: https://www.lifewire.com/clear-cookies-for-one-site-4587347 When searching for cookies, search for [event].virtualbyvario.com or simply virtualbyvario.com
Trouble Signing In or Staying Logged In
The website uses “cookies” to keep you logged in. The site also uses different “caching” systems to help with performance. Both cookies and cache can cause issues signing in. If you are having issues logging in, try any/all of these steps:
- Before initiating an email login, CLEAR YOUR COOKIES.
- Try a different browser (Chrome, Safari, Edge, Firefox, etc.)*.
- Try an incognito/private window within your browser*.
- Try a different network / WiFi.
- CELL ONLY. One surefire way to test is to get on your smartphone, using CELLULAR data only. Do NOT connect to the same WiFi you were on earlier. Visit the site from cellular connection and try from your phone.
- CELLULAR > HOTSPOT. If the above CELL ONLY option is successful and if your phone has a hotspot feature, turn on the hotspot and connect your computer to the hotspot.
* If you are using a different window or browser, you will have to copy the full link from your credential email and then paste it into your browser. Do NOT simply click it from the email – it will open up the original browser that you are trying to avoid.
On a Work Network or VPN?
Some “work” computers, apps/browsers and networks are locked down by IT settings and/or security policies, etc. If you are using a work computer and/or are connected to a work network or VPN, you might need to reach out to your IT department to see if they can assist.
Depending on the build and specifications of your platform, you may have the ability to reset your password.
Reset Your Password Instructions
- From the login page, click “Change Your Password” to be taken to the Password Reset page
- Enter your email address.
- You will receive an Email. Check your Junk/Spam or Notifications Folders if not in your Inbox within a few minutes. Click on the link in the email.
- A strong password will be autogenerated for you. You can accept this (make cure you copy/record it) or you can add a new one.
- Click save.
Didn’t receive your password reset email?
There are a few layers and levels of email filtering.
- Individual Account / Program / App – Gmail, Outlook, MacMail, etc. You usually have control over this. There might be settings to review (such as whitelists, etc.) This is also your spam/junk box so be sure to check there.
- Mail Server – Google, Yahoo, Your IT Department – you as an individual likely do not have control over this level. This is the “front door of your building”
- Top level ISP / Backbone – This is the “highway”. No one at our level, or even your IT department, has much control over these, but it’s rare that legitimate email gets blocked at this level but it can happen.
Some items to check (in this order)
- Check your Spam/Junk Folder.
- Check any other “folders” such as Notifications, Updates, Promotions, etc.
- Add “noreply@xxxxx.virtualbyvario.com” or “virtualbyvario.com” or “customplatformdomainname.com” as a “safe sender” and then try again.
- Spam / Filtering could also be done at the Server level, meaning your server received the email (aka The mailman was allowed into the building’s front door), but the email was never delivered to the recipient’s email account (aka the mailman wasn’t allowed to proceed down the hallway to your office). Contact the IT department in this case.
Password Reset Link Never Works / Invalid
The password reset link can only be accessed once, for security reasons. We know that some IT Departments with strict IT layers in place us system that reach out and access links inside emails to check their validity, see if the site on the other end is safe, etc. This in turn makes the reset link “used” so when you (the human) try to access it, it’s no longer valid.
Try disconnecting from your work IT and access via a different network. Using your phone (on cellular network) usually works. Or you can connect your computer to your phone via Hotspot (Again, the phone likely needs to be on Cellular Network and not your work network)
One of the most common issues are out of date web browsers. If you are on an old browser, you might have seen a warning / pop-up on your screen alerting you to an outdated browser. You can also check your browser here:
You can also check your browser by clicking the Name > About Browser.
Compatible Browsers
Please make sure to download and/or use one of these web browsers listed below. If you’re using an old, outdated version of Internet Explorer (IE), the live stream will not show on the screen.
- Chrome
- FireFox
- Microsoft Edge (for PCs)
- Safari (for Macs)
Internet Explorer Warning Bar
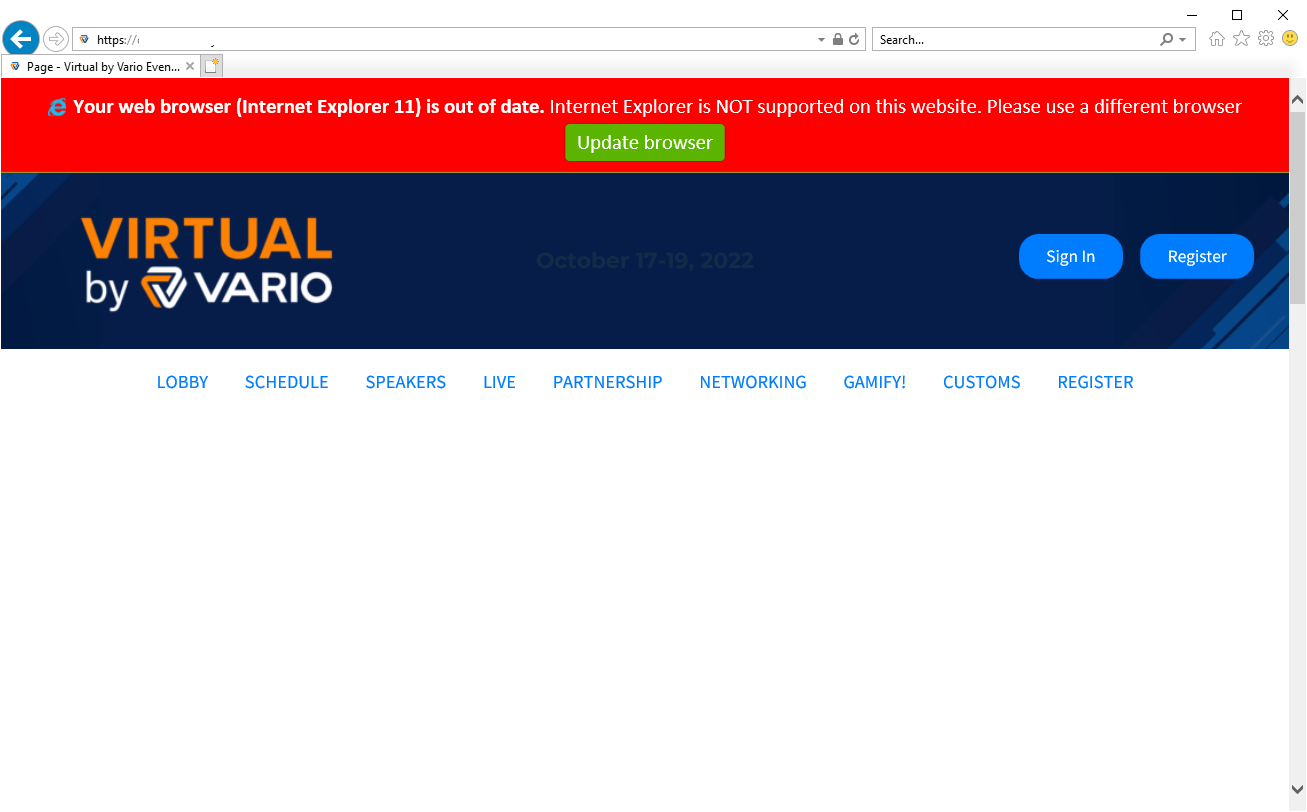
This is what will appear on Internet Explorer browsers. In addition to the warning notice bar, none of the background images will work, the navigation bar barely works (no dropdowns), registration forms won’t work, and even if you could get in, streaming video iframes also don’t work.
Video Test
If you can see and hear this video, you should be able to see the livestream(s) and other videos.
Recommended Internet Speed
The recommended download speed to view/consume online videos and streaming sessions in HD is 5 Mbps Download (Some references will state 1-4 Mbps for video conferencing, which is likely okay; 5 Mbps or greater will ensure the highest quality.) Anything more is great! Anything less and there is the chance of degraded quality/performance.
Testing Your Internet Speed
To test your internet speed, click here. Again, you should have at least 5 Mbps (download), while 10 or more is great!
Here is a good article that discusses different internet speeds and what to do and expect.
What If It’s Not Enough?
Other devices on your home network, such as other computers, phones, tables, smart TVs and other “smart” devices, all take up capacity on your network. Turn off or disable any/all unnecessary devices.
I’ve Turned Everything Off and Still Not Enough?
Try accessing from your mobile phone’s hotspot if you have one. Some cellular hotspots have very fast internet connections. Click here for an article with instructions to connect to a cellular hotspot.
Or, you can head down to your local coffee shop or similar who provides public WiFi. **NOTE – these public areas are not necessarily “secure,” so proceed at your own risk, especially if you or your company has guidelines about accessing the internet on public WiFi networks.
Video Player Muted
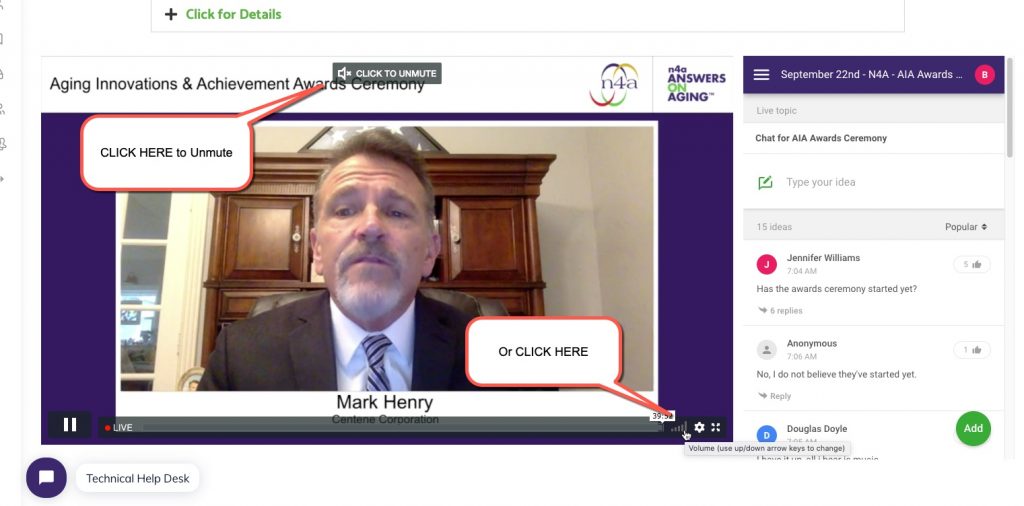
Depending on your browser or system/computer setup, an embedded video MAY start in a “Muted” state. See below on how to ensure the video is not muted.
Browser Tab Mute
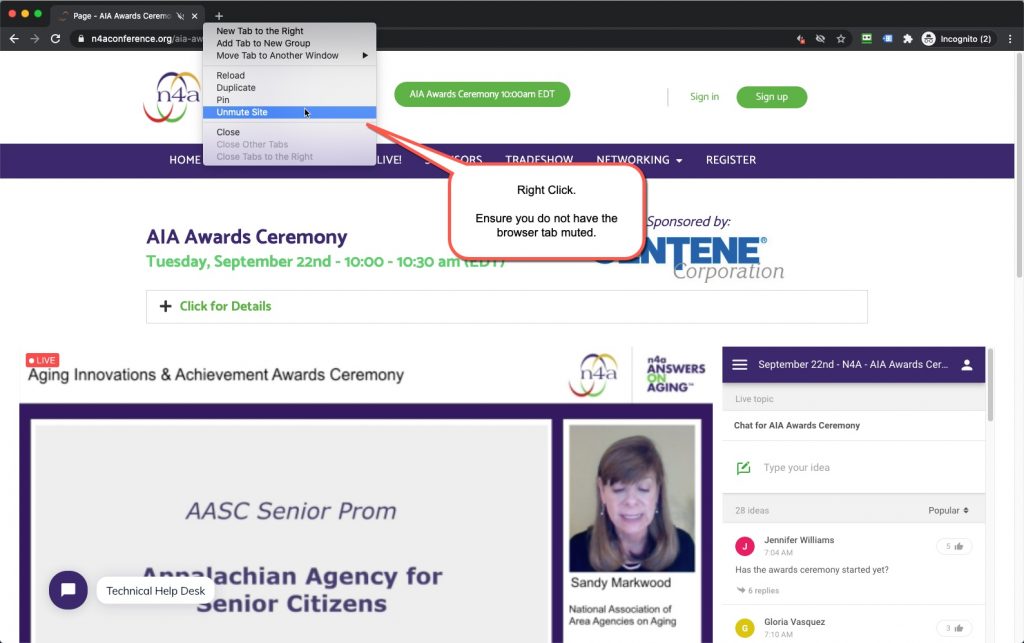
Many browsers such as Chrome will allow you to mute a tab. Ensure the tab is not muted.
There may be times where things just simply don’t load or fully load. This can be attributed to many things – many relate to the loading and/or caching of web pages on your computer and web browser. Here are some steps to try:
1. Refresh your browser
Yes, sometimes a simple reload will do the trick. And yes, sometimes it takes 2 or 3 times.
- Press F5, or click the reload button.
2. Force Refresh Browser
This helps clear out some more saved settings and data.
- Chrome, Firefox, or Edge for Windows: Ctrl+F5 (If that doesn’t work, try Shift+F5 or Ctrl+Shift+R).
- Chrome or Firefox for Mac: Shift+⌘+R.
- Safari for Mac: There is no simple keyboard shortcut to force a hard refresh. Instead, press ⌘+Option+E to empty the cache, then hold down Shift and click Reload in the toolbar.
3. Incognito / Private Browser Window
Using an incognito or private browser is a very good way to check things. These browser so not save any cache, store any cookies, etc. when shut so you are always guaranteed a clean, fresh experience. Learn more here.
- Google Chrome: Incognito (Ctrl+Shift+n or ⌘+Shift+n for Mac)
- Mozilla Firefox: Private Browsing (Ctrl+Shift+p or ⌘+Shift+p for Mac)
- Microsoft Edge: -InPrivate Browsing (Ctrl+Shift+n or ⌘+Shift+p for Mac)
- Safari: Private Browsing (Command⌘+Shift+n)
- Opera: Private Tab / Private Window (Ctrl+Shift+n or ⌘+Shift+n for Mac)
NOTE: You will have to log back in since the nature of incognito windows do not save cookies or similar information.
4. Clear Browser Cache
5. Try a Different Browser.
Most computers have more than one browser installed. If not, it’s easy to try another one:
- Chrome
- FireFox
- Microsoft Edge (for PCs)
- Safari (for Macs)
CE Tracking Information (When applicable)
These notes are for platforms that have the “CE Tracking” module installed.- Each person must logon to the online platform individually under their own name. If you watch with another person, only the person who is logged on will receive a CE certificate.
- Joining a live session or accessing a VOD counts as signing in, and leaving those pages counts as signing out.
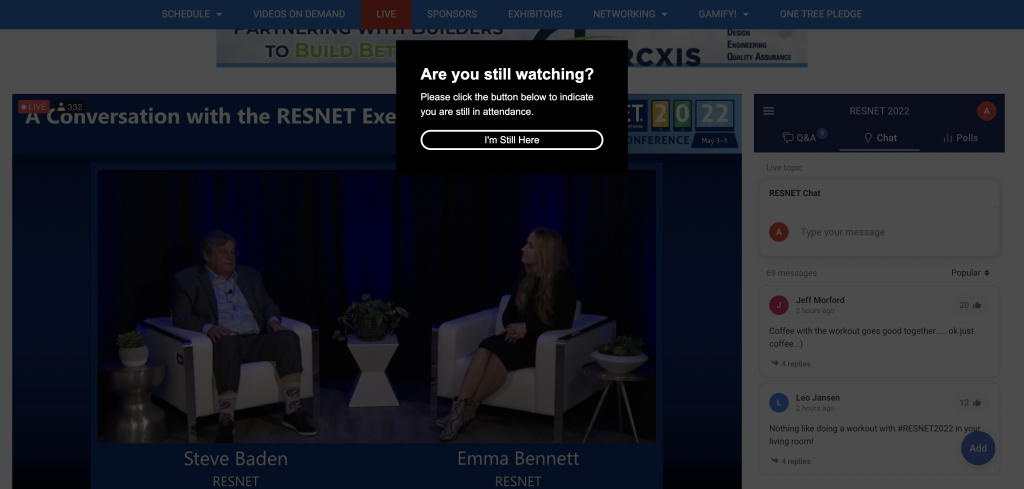
- In addition to joining the sessions you will be required to respond to an “Are you still watching” pop-up at intervals during the sessions.
- If you are in full screen mode on your video you will not see the pop-up. You will still hear an audible tone. If you hear that tone, please leave full screen mode to engage with the pop-up.
VPNs, Firewalls and other “Security” methodology are great for keeping online activities safe & secure, but they might also block your access to certain features and websites.
There are just so many different ways that ISPs, network providers, companies, IT personnel and even individuals can ‘block’ websites, that we couldn’t provide a comprehensive guide to cover them all. However, a few top-level points may help:
Testing
- Make sure you can visit the website. If you can visit the website, it is not blocked.
- Make sure you can both SEE and HEAR the video found on the “Testing & Setup” Tab on the support page. If you can see & hear the video, then our service provider Vimeo is not being blocked.
Domain Names & Server Whitelisting
- *.virtualbyvario.com
- {yoururl}.virtualbyvario.com
- 144.202.87.242*
*Your server *may* be different. Check with your Project Manager to confirm.
Email Whitelisting
- *.{yoururl}.virtualbyvario.com
- noreply@{yoururl}.virtualbyvario.com
- Disconnect from Company VPN
- Use a non-work internet connection – even a personal phone hotspot will work.
- Use a non-work computer on a non-work internet connection. Including using a personal mobile or tablet device to view the content.
For events and/or individual sessions that use zoom…
Zoom is a video conferencing tool that can be used on mobile devices, laptops and desktop computers. This guide outlines how to get started with Zoom and join a meeting, as well as providing some tips on meeting etiquette and Zoom accounts.
To get started
To use Zoom, you will need:
- a camera: either built into your PC/Mac/mobile device or a separate webcam.
- a microphone: these are usually built in, or will be in your webcam if you use one
- speakers: either built in or freestanding and plugged into your device, or headphones. Headphones are quite useful as they cut down on outside noise.
- a broadband internet connection
- The Zoom application (app) installed on your device. This saves a lot of time later on when you join a meeting.
Installing
Go to the Zoom download centre at https://zoom.us/download Click on the Download button under Zoom Client For Meetings.
The Zoom app will begin to download; you will then need to click on the download file and follow the installation instructions to install Zoom on your device.
Success! You now have the Zoom app on your device or computer.
Zoom account
- Whilst you do need to download the Zoom app, you do not have to set up a Zoom account in order to join a meeting.
- Every Zoom meeting has a unique number (the meeting ID) and password. These are generated by Zoom and are required in order to join the meeting.
- When someone invites you to a Zoom meeting, you’ll be sent an email containing a link to the meeting, the meeting ID and the password.
- You can join meetings by simply clicking on the link (which will look something like this: https://us04web.zoom.us/j/123789654) and then entering the meeting password when prompted to do so. More on this on page 2; see ‘Joining a meeting’.
Joining a meeting
- At the start time of your meeting – or just before, click on the link in your email invitation to join via your computer or mobile device. The email content will look something like this:

- If you haven’t already downloaded the Zoom app, you’ll be prompted to do so now.
- If you have downloaded, then click on Open zoom.us to launch the app.
- If you prefer, you may join a meeting without clicking on the invitation link by going to https://zoom.us/join on any browser (e.g. Chrome, Firefox, or Safari), entering the meeting ID, clicking on Join, then entering the meeting password when prompted to do so.
- You will be prompted to select your video option: join with video or join without video (select one on screen)
- Your meeting host will be notified that you are joining the meeting and will admit you.
- You may be prompted to choose your audio option. Select Join with Computer Audio.
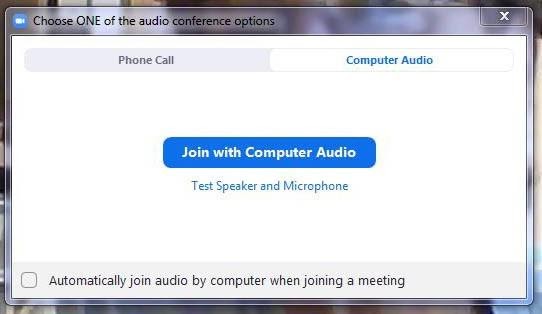
- You can test your audio by clicking on test speaker and microphone and adjust to suit.
- The same applies if using a mobile device.
During a meeting
Video layout
To select the view you’d prefer, see the top right of your Zoom screen at the top right for Windows, or top left for Mac.
There are three video layouts for meetings: Active speaker, Gallery & Mini.
- Active speaker is the default setting and will switch the large video window between whoever is speaking. The rest of the participants are usually arrayed as ‘thumbnails’ at the top of the screen.
- Gallery view shows everyone present in a grid and highlights the person speaking.
- Mini view allows you to minimize the Zoom video, but keep it on top of any other applications you may have open on your computer. You can move this window around on your screen. To switch to Mini-window view, click on the minimize icon.
The Dashboard
You will also see a number of icons at the bottom of your Zoom screen. These allow you to:
- mute/unmute your microphone
- turn the video on/off
- see who else is in the group (participants) – click this icon to enable the sidebar on your Zoom screen
- Chat – allows you to ask questions or comment without interrupting the meeting; these messages will appear in the sidebar and be visible to all participants unless you select a specific recipient, e.g. the meeting host.
- The next two icons (Share screen and Record) are only available if enabled by the host/organizer.
- Reactions – this feature enables participants to provide non-verbal feedback, such as a ‘thumbs up’ icon on-screen.
![]()
Participant Etiquette
Video conferencing or meetings are in many ways exactly the same as face-to-face meetings. Here are a few pointers to make everyone’s experience more enjoyable.
- Be ready for the meeting in good time and activate the link a few minutes early so that no-one is kept waiting.
- Pre-check that your camera and audio are working and that your video is on when you join the meeting.
- Ensure your camera is more or less at eye-level – if necessary, stack something under your device to bring it up to the right height. This will enable you to look at the camera when you’re speaking, rather than at the on-screen picture of yourself ☺
- Eliminate / reduce shadows on your face by positioning your computer/device so that the primary light source (window, lamp, etc.) is behind the camera, i.e. coming from the same direction that your camera is pointing and not from behind you.
- Mute your microphone when you’re not speaking; this cuts down on extraneous background noise.
- Try not to speak at the same time as other participants; take direction from the meeting host on this.
Here are top tips any user can take to get the best meeting experience in any situation.
Issues Connecting Your Audio or Video? Click Here
Download Webex Meetings Application
Make sure you have the desktop version for the best experience.
Run a speed test
Go to speedtest.net. You will want a minimum of 10mbps up and down for a solid connection
Turn off VPN
Your employer may have provided you with a VPN (virtual private network) service that allows you to use the company network while working remotely. Often, VPN can limit the bandwidth available to Webex. You can use Webex Meetings outside of VPN for the best experience.
Reduce simultaneous streaming activities
We all love a binge-worthy TV series! But, if you’re joining a meeting and your family is also home, ask them to hold off on that next episode of their favorite show until your meeting is over. Wherever possible, consider downloading shows for off-line watching to save valuable bandwidth during your work hours.
Hardwire your workstation
Depending on your location and how many people are using the same Wi-Fi around you – you may see slower speeds on Wi-Fi than on a wired ethernet connection to your workstation.
Reduce movement and distractions
Consider muting your line when you aren’t talking. Establish good meeting etiquette to enable a great collaborative experience.
If you are having issues joining the Webex meeting, please contact us using the contact tab to the left.
If you are having platform related issues (logging in, restricted access etc) please use the support help desk widget located on the lower left side of the site.
